
- Sarushima: The Ultimate Guide | A Ghibli-Inspired Uninhabited Island 10 Minutes from Yokosuka
- Sarushima: Tokyo Bay's uninhabited fortress island. This guide details access, fees, and Ghibli-esque scenery, just a 10-minute ferry ride from Yokosuka.
Last updated:

Sarushima, the only uninhabited island in Tokyo Bay, is a popular tourist spot, especially for its rumored resemblance to Ghibli’s world of “Laputa: Castle in the Sky.” Just a 10-minute ferry ride away, visitors flock to experience this mystical place.
But how much time do you really need to explore Sarushima? And what exactly can you find here that feels like Laputa’s world?
This time, we landed on Sarushima to thoroughly investigate!
I’ll share our exact walking route, the timeline, and descriptions of the spots we visited, so use this as a guide for your own Sarushima adventure.
For more detailed information about Sarushima, including key attractions and how to get there, check out the following:
Read more about Sarushima
For information on the exploration tours and priority boarding for ferries, click below:
Read more about Exploration Tours and Priority Boarding
🕛 12:40 pm
After a 10-minute ride on the 12:30 pm ferry, we landed on Sarushima.


Walking off Sarushima Pier leads you onto a boardwalk. The view here is excellent, with a panoramic view of Tokyo Bay and the city of Yokosuka—perfect for lunch.

On the right side of the photo is the Welcome Center, the island’s management facility.

On Sarushima, you can join the “Uninhabited Island Exploration Tour” led by professional guides.

We had pre-booked the guided tour at Mikasa Terminal, so we checked in at the Welcome Center next to the boardwalk.

The participation fee is 600 yen, but if you book at Mikasa Terminal, it’s 100 yen cheaper at 500 yen.

For more information on tours and discounts, see below:
Read more about Tours and Discounts
The exploration tour schedules are aligned with ferry departure times.
We arrived on the 12:30 pm ferry, and our tour was set to depart at 12:50 pm. If you’re on the 30-minute basic course, the tour starts 10 minutes after landing, and for the 60-minute advanced course, it starts 20 minutes after.
| Departure | Arrival at Sarushima | Tour Start | Remarks |
|---|---|---|---|
| 9:30 am | 9:40 am | 9:50 am | |
| 10:30 am | 10:40 am | 10:50 am | |
| 11:30 am | 11:40 am | 11:50 am | |
| 12:30 pm | 12:40 pm | 12:50 pm | Weekends and busy seasons only |
| 1:30 pm | 1:40 pm | 1:50 pm | |
| 2:30 pm | 2:40 pm | 2:50 pm | |
| 3:30 pm | 3:40 pm | 3:50 pm | Only available from 3/31 to 10/31 |
| Departure | Arrival at Sarushima | Tour Start |
|---|---|---|
| 10:30 am | 10:40 am | 11:00 am |
| 12:30 pm | 12:40 pm | 1:00 pm |
Be sure to check in promptly after landing to avoid missing the tour!
At check-in, you’ll receive an earphone guide. You can use this to hear the guide’s explanation via wireless audio.

The group splits into smaller teams based on the number of participants, with one guide per group. Since the distance between participants and the guide can sometimes make it hard to hear, these earphone guides ensure everyone can catch the commentary, even from a distance.
Before starting the tour, we watched a video explaining key precautions while exploring the island.

And now, let’s begin our Sarushima exploration!


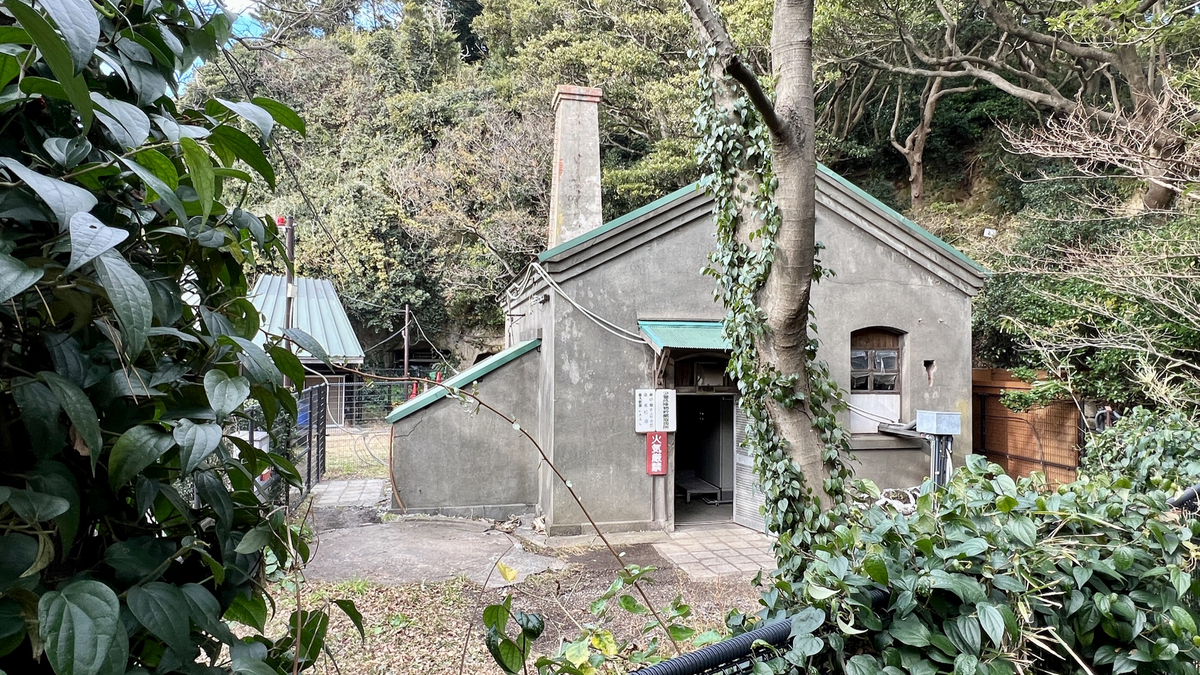
Tucked away beside the walking trail, a rusting engine quietly sits, unnoticed by most. This engine once belonged to the old Imperial Navy, but it has been slowly shrinking as the rust and weathering progress.


The Sarushima Power Plant was built in the mid-Meiji era (1895). It generated electricity by burning coal to power a steam turbine (a classic steam engine system).
The building consists of self-standing brick walls and a roof made with a wooden king-post truss structure. Inside, there were a boiler room, generator room, and a coal storage area. There is also an underground water tank below the boiler room to store water for the steam engine.
The electricity produced here was sent from the rear of the building through a cutting in the rock to a lighting station on the hilltop at the island’s center. During the war, this plant supplied all of the island’s power.
To avoid detection by the enemy, the chimney was built low, which is quite noticeable for a coal-powered plant.

Interestingly, even now, the island’s electricity is generated here. You can hear the sounds of the working machinery and detect a distinct fuel smell if you get close enough.

It’s impressive that a power plant built in the Meiji era is still in operation today.

Unfortunately, due to the deterioration of the building, the power plant is not open to the public. However, the equipment inside remains functional.


After passing the power plant, you’ll enter the cutting, an awe-inspiring sight.

A cutting refers to a path carved through hills or mountains. Sarushima’s cutting was entirely dug by hand with pickaxes.

This cutting continues along the walking trail, showcasing how the entire island was transformed into a fortress.

The holes you see in the walls here and there were made by pickaxes.

The ground in the cutting is incredibly soft. You can even press your finger into the walls, and they’ll give way. Over time, the roots of giant trees have broken through the cutting walls, creating a surreal, almost Laputa-like atmosphere.


The open-cut trench contains barracks and ammunition depots, all built within the cutting.


The brick arches above the doors and windows indicate this was a barracks, meaning people lived here. This was to distinguish it from other nearby facilities like ammunition depots and command posts.
A map of the Sarushima fortress layout shows that the barracks and ammunition depots were closely located, which seems quite dangerous.

Next to the barracks, there are small windows where telescopic equipment was inserted to monitor enemies outside the island.

Here is a second barracks:

This one is quite damaged. You can see a crack running through the center of the wall.

The guide explained that this crack was caused by a massive explosion. After Japan surrendered, the Imperial Army was ordered to gather all weapons and ammunition in one place, which they did at a square above this barracks. After the Japanese soldiers left the island, the Allied forces blew up the gathered munitions, causing this crack in the barracks below.
Seeing this up close, you can really feel the force of that explosion.
This is the remains of a toilet. This part was used for urination.


And this is the part for defecation.


The indentations in the ground were where people would do their business. Apparently, this type of facility was common across Japan, not just in military installations.
The guide mentioned that Edo (now Tokyo) was once considered the cleanest city in the world. Foreigners who visited were impressed by the public toilets placed at the edges of streets and the fact that no one relieved themselves in public spaces.
This is the ammunition depot, characterized by its arch-shaped entrance, made using the same French-style brickwork found in the tunnel ahead.


Though we couldn’t enter, inside, the depot is a barrel-vaulted room, with the walls coated in plaster.
The second ammunition depot was more severely damaged.


The walls of the cutting are reinforced with concrete, but the sight of nature reclaiming the fortress is breathtaking.

Moss covers the man-made structures, and the combination of historical ruins and nature creates a mysterious atmosphere.


After passing the ammunition depots, you’ll come across a tunnel.

This brick tunnel is one of the oldest structures of its kind in Japan.
It is also known as the “Tunnel of Love.” The tunnel is quite dark, and when couples walk through, they tend to naturally get closer to each other because of the dim lighting. Hence, the name.
The tunnel is indeed quite dark.

There’s something otherworldly about the tunnel’s atmosphere.

Though it’s dark, the ambiance is pleasant.

The darkness combined with the nostalgic color of the bricks makes you feel like you’ve traveled back in time to the Middle Ages.

There are stairs leading outside that were once used as a communication passage.

These stairs are now off-limits due to their deterioration, but they exude an eerie vibe. It feels like stepping outside might take you back to wartime.

After about 90 meters, the tunnel comes to an end.


Upon exiting the tunnel, you’ll find yourself in an area where the fortress and nature are completely intertwined. This is the spot that most closely resembles the world of Laputa. The sight is nothing short of mystical.


Ahead, you’ll encounter another short tunnel with some interesting features.

This tunnel once housed spaces for transporting ammunition.

At the tunnel’s end, there’s a wider space where ammunition was handled.
A narrow room beside this space was used for commanders to take cover while directing ammunition deliveries through a small window.

Seeing these remnants up close, you get a real sense that Sarushima was a military fortress.
🕛 1:25 pm

One of Sarushima’s main attractions is the gun battery remains.


This spot once housed a 40-caliber 8 cm anti-aircraft gun. The guide showed us a photo of the original gun emplacement.

The guide mentioned an accident where a shell was fired straight up and fell back down, causing an incident. Eventually, the gun was replaced with a 12.7 cm gun because the original couldn’t reach enemy planes’ altitude.

For the 30-minute tour, the guide finishes here at the gun battery, and the tour disbands.
At this point, it was 1:30 pm, about 50 minutes after landing on Sarushima.
From here, you’re free to explore on your own. Since we’ve covered the outbound portion of the walking trail, you can leisurely stroll back along the return route.

Oimono Nose Square offers a spectacular view of Tokyo Bay.

After walking through the narrow cuttings, the open space here feels refreshing.


There’s a staircase at Oimono Nose Square leading down to the shoreline.


The simple grandeur of nature is also part of Sarushima’s charm, making it more than just a place for historical ruins.

The only place on the Sarushima trail where you’ll encounter stairs is the path leading to the observation deck.


This is the only part of the walk where you’ll need to exert some effort, so take your time. If you pause along the way, you’ll be treated to glimpses of the ocean through the trees.
While it’s possible to bring a stroller, it’s not recommended unless you’re confident in your strength and stamina, as the stairs are quite challenging.

After climbing the stairs, you’ll reach the observation deck.

Interestingly, this deck was once used as the lair of the villains in the classic “Kamen Rider” TV show.
Due to deterioration, the observation deck is off-limits, so you can’t climb it anymore.

The structure is simple, and although you can’t enter, you can peek inside.


While you can’t ascend the deck, you can still enjoy the beautiful scenery from the square in front of it.
Beyond the observation deck lies a wide open square.

As it’s the highest point on the island, the views here are breathtaking. You can see the U.S. Navy base in Yokosuka.


🕛 1:52 pm
We returned to the boardwalk where the tour began.
At this point, it had been about 1 hour and 10 minutes since we landed on Sarushima. Including the guided tour and our own exploration, the whole trip took about an hour.


🕛 2:05 pm
Having thoroughly enjoyed Sarushima, it was time for lunch on the boardwalk.
The must-try dish? Yokosuka Navy Curry (1,200 yen, with milk).

The curry, paired with the spectacular view, makes for an unforgettable meal. The addition of milk is a nice touch.
🕛 2:30 pm
While we checked in for the tour on the first floor, the second floor of the Welcome Center serves as a rest area and exhibit space.
The rest area is spacious, and from the second floor, you can relax while gazing out over Tokyo Bay.

The exhibit features historical artifacts, explanations of the island’s facilities, and displays of items used during the time.


🕛 2:45 pm
We boarded the return ferry back to Mikasa Terminal.


The view from the second deck of the ferry is especially recommended.

As the ferry pulls away, Sarushima begins to fade into the distance. The world of Laputa truly does exist here. The sight of man-made structures being reclaimed by nature is profoundly mystical.


We left on the 12:30 pm ferry and returned to Mikasa Terminal at 2:55 pm.
The total time spent exploring Sarushima was 2 hours and 25 minutes.
In conclusion, plan for 2.5 to 3 hours if you’re visiting Sarushima.
Despite being an uninhabited island, Sarushima is well-managed and far from the “survival” image typically associated with uninhabited islands. Although it’s a former military fortress, there’s no sense of tragedy here since no battles took place on the island.
The fortress ruins, carved into the island’s terrain and now overtaken by nature, create a mystical atmosphere.
In short, Sarushima is an incredibly photogenic uninhabited island.
That’s all from the field! Be sure to visit Sarushima for yourself!

